There are at least four ways to start a device in Safe Mode on Windows 10: Command Prompt, Settings, Start power menu, and MSConfig. You can troubleshoot and fix common hardware and software issues by loading a set of basic features and generic device drivers in Safe Mode.
When your computer is not booting up properly, or if there are issues with a network connection, an application, or Windows Update that is stalled downloading updates, you can utilize Safe Mode to troubleshoot the issue. Additionally, it is an excellent setting for identifying and resolving issues with graphics drivers and running a virus scan to get rid of any malware that would otherwise be impossible to resolve when the operating system is in normal mode.
With Windows 10, it is no longer possible to start in Safe Mode by simply rebooting your device and using the F8 key.
This post will teach you how to use the Command Prompt, Settings, Power Menu, and MSConfig to launch Windows 10 in Safe Mode.
-
How to start Windows 10 in Safe Mode using Power options
-
How to start Windows 10 in Safe Mode using Settings
-
How to start Windows 10 in Safe Mode using Command Prompt
-
How to start Windows 10 in Safe Mode using MSConfig
How to start Windows 10 in Safe Mode using Power options
Follow these instructions to launch the Power menu in Safe Mode:
Launch Windows 10.
Select the Powermenu.
After holding down the Shiftkey, click the Restart button.
The power menu in Windows 10
To troubleshoot, choose the option.
On “Advanced options,” click.
Select “Startup Settings.”
Startup settings for Windows 10

To restart, click the button.
Restart option in startup settings
To launch Windows 10, select one of the Safe Mode settings, such as:
- Enable Safe Mode.
- Enable Safe Mode with Networking.
- Enable Safe Mode with Command Prompt.
Usually, option No. 4 (Enable Safe Mode) must be used, depending on the issue. However, you may also choose option No. 5 (Enable Safe Mode with Networking) if you want internet connectivity in order to update drivers or download a new antivirus definition to perform a complete malware check.
Following the instructions, the device will boot up in the mode you specified, enabling you to troubleshoot and resolve almost any issue with Windows 10.
How to start Windows 10 in Safe Mode using Settings
Follow these procedures to enter Safe Mode in Windows 10’s Settings:
Open the settings.
On Update & Security, click.
Select “Recovery.”
Click the “Restart” button in the “Advanced Startup” section.
Option for advanced startup
Click the Troubleshoot option on the Choose an option screen.
Press the button labeled “Advanced options.”
Select “Startup Settings.”
Startup settings for Windows 10
To restart, click the button.
Restart option in startup settings

To launch Windows 10, select one of the Safe Mode settings, such as:
- Enable Safe Mode.
- Enable Safe Mode with Networking.
- Enable Safe Mode with Command Prompt.
Options for Windows 10 starting settings
When you finish the procedures, the computer will go into Safe Mode, which makes it easier to troubleshoot and fix system issues.
How to start Windows 10 in Safe Mode using Command Prompt
Follow these steps to utilize the Command Prompt to boot Windows 10 in Safe Mode:
LaunchStart.
Look up “Command Prompt,” then right-click on the first result and choose “Run as administrator.”
Press Enter after typing the following command:
The bcdedit command in Windows 10
Restart the gadget.
To access the Startup Settings menu options, hit the F8 key in the Windows Boot Manager menu.
The boot manager for Windows 10
- Enable Safe Mode.
- Enable Safe Mode with Networking.
-
Enable Safe Mode with Command Prompt.
To launch Windows 10, select one of the Safe Mode settings, such as:
To launch Windows 10, select one of the Safe Mode settings, such as:
Options for Windows 10 starting settings
Windows 10 will launch in Safe Mode with the selected option when you finish the instructions.
The same steps can always be used to quit the basic boot level, but in step number three, be sure to use the commandBcdedit /set {bootmgr} displaybootmenu no.

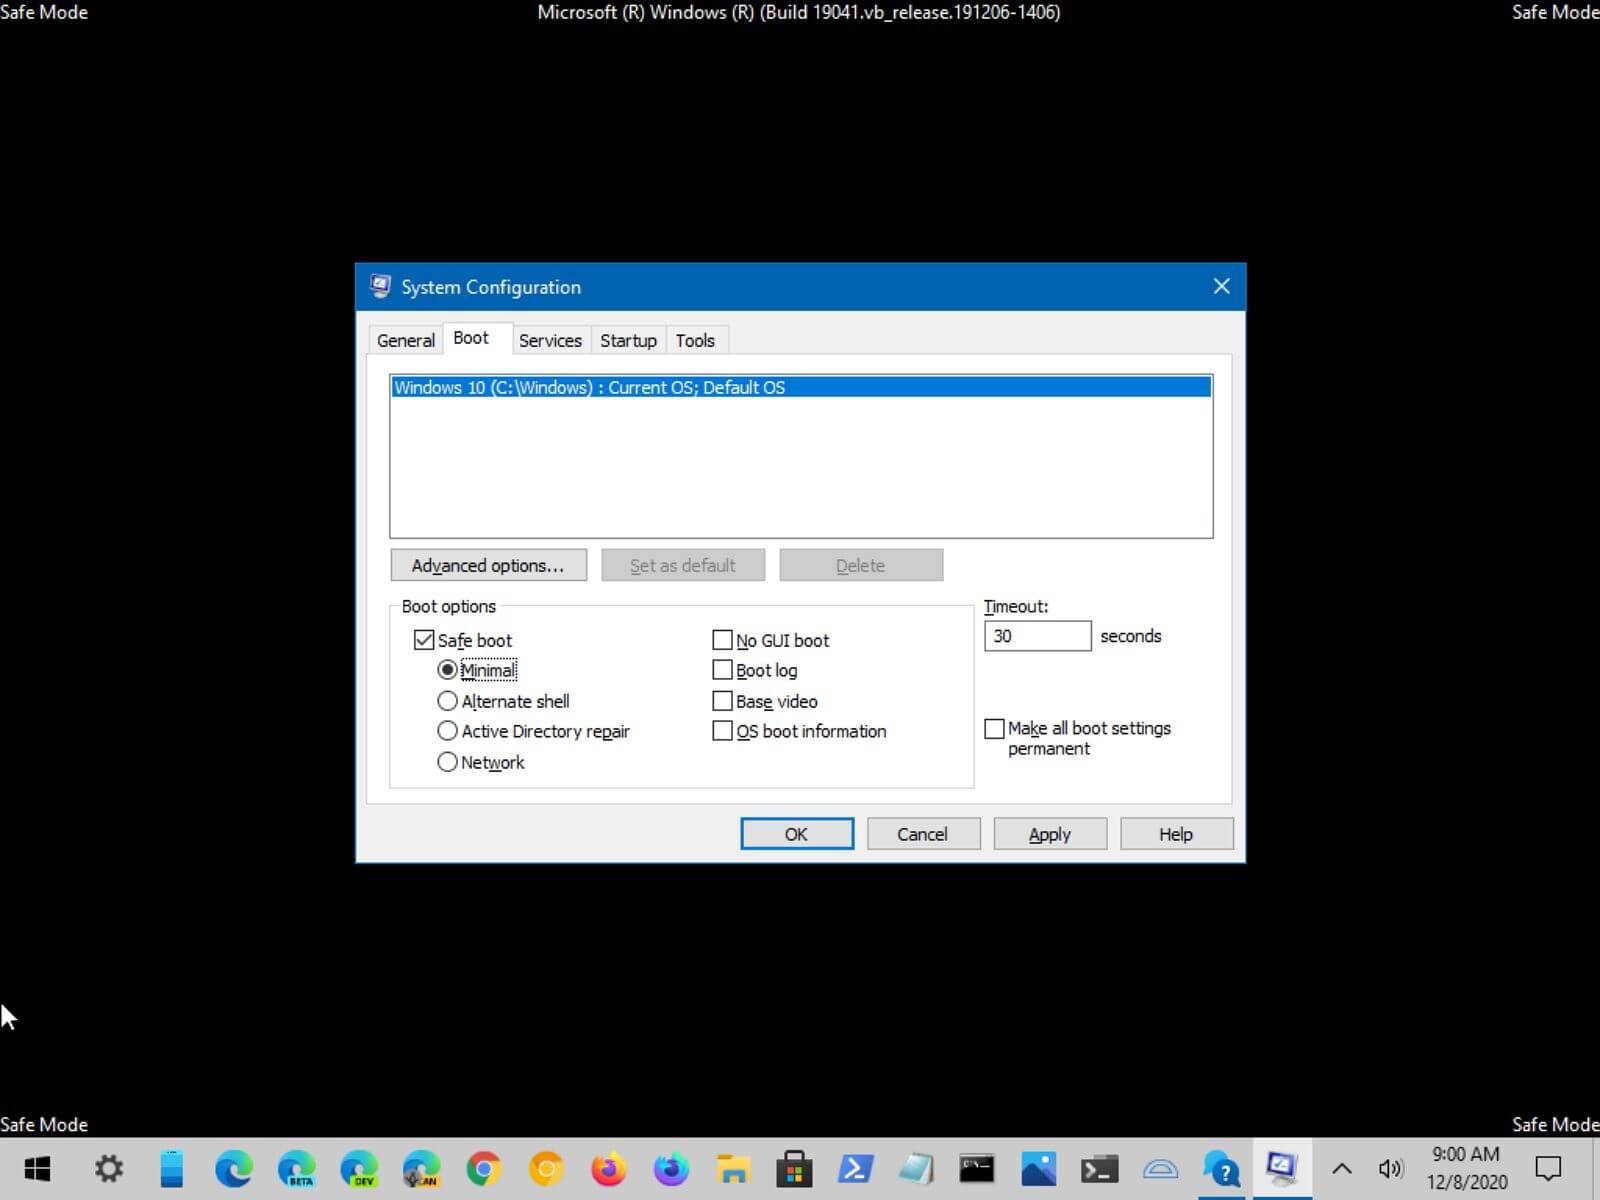
How to start Windows 10 in Safe Mode using MSConfig
Use MSConfig to launch Windows 10 in Safe Mode by following these steps:
LaunchStart.
To launch the app, search for “formsconfig” and select the top result.
Press the Boottab button.
Verify the Safe boot option under the Boot settings section.
Select the Network option to boot in the default environment with networking support, or the Minimal option to start Windows 10 in Safe Mode.
Boot settings for MS Configuration
Press the “Apply” button.
Press the “OK” button.
Restart the computer.
This option’s sole drawback is that, unless you reverse the modifications, Windows 10 will keep booting into Safe Mode.
You can use the same steps to undo the changes after fixing the device’s issue, but be sure to clear the Safe boot option in step No. 4.
The aforementioned procedures will assist you in getting into the basic boot level on both Windows 8.1 and Windows 10 devices.
Additionally, the Advanced startup menu can be accessed in a variety of ways. To discover the many methods for accessing Windows 10’s Advanced Startup menu, consult this earlier guide.
Updated on December 8, 2020:Originally released in February 2016, this article has been updated to reflect the most recent version of Windows 10.